PyTorch on Windows with GPU
Say, what would you pay to get things done five times faster than you normally could? The price of a Nvidia GPU perhaps? Because that’s exactly what you could get for your money when training a neural network.
Training a neural network, especially a deep neural network, is an extremely computationally expensive process, but one with huge potential for parallelisation. Ever since Nvidia released their CUDA Toolkit for parallel computing, Nvidia GPUs have capitalised on exactly this opportunity, dramatically improving the training times of neural networks compared to what a CPU can achieve.
Once upon a time, (from personal experience) it was a royal pain to get CUDA setup with a local GPU for machine learning frameworks like PyTorch or TensorFlow. Instead, it was easier to use online tools like Kaggle or Google Colab to train small networks, since these platforms offer pre-configured GPU acceleration. However, nowadays Pytorch at least (I’m not sure about TensorFlow) makes it trivially easy to use your own GPU. After all, Kaggle and Colab are great, but I already paid for my GPU!
Installing PyTorch with CUDA support
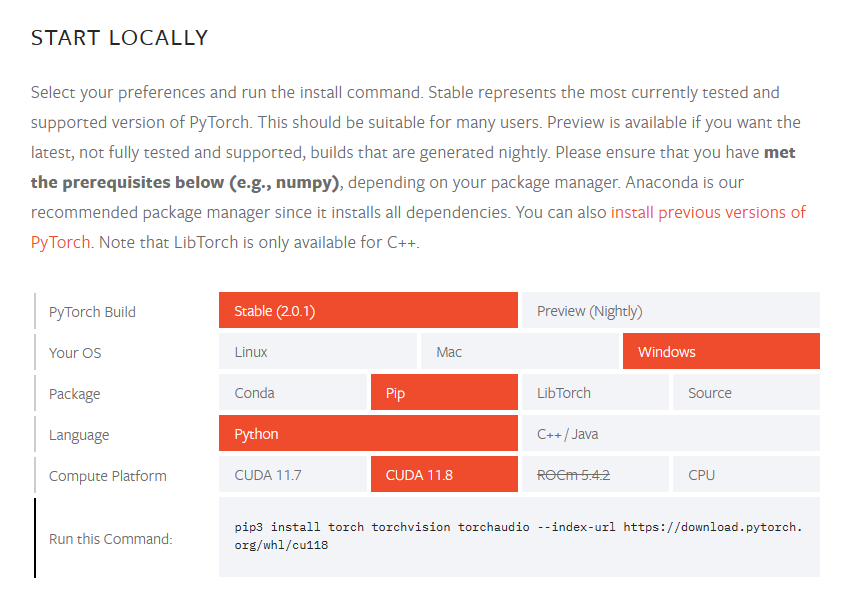
To install PyTorch with support for your local GPU, head to: https://pytorch.org/get-started/locally/.
You’ll be met with a easy interface to select the appropriate PyTorch version for your local machine.

I’m on a Windows machine, and prefer to install my Python packages using pip. To determine your compute platform, open a terminal and run the command nvidia-smi. If the command is invalid, you may have to install the CUDA Toolkit (for Windows).
When CUDA is installed, the output of nvidia-smi should start with something like this:
PS C:\Users\deren> nvidia-smi
Wed May 17 21:11:40 2023
+-----------------------------------------------------------------------------+
| NVIDIA-SMI 526.98       Driver Version: 526.98       CUDA Version: 12.0     |
|-------------------------------+----------------------+----------------------+
| GPU  Name            TCC/WDDM | Bus-Id        Disp.A | Volatile Uncorr. ECC |
| Fan  Temp  Perf  Pwr:Usage/Cap|         Memory-Usage | GPU-Util  Compute M. |
|                               |                      |               MIG M. |
|===============================+======================+======================|
|   0  NVIDIA GeForce ... WDDM  | 00000000:09:00.0  On |                  N/A |
|  0%   45C    P8    11W / 170W |   4099MiB / 12288MiB |      2%      Default |
|                               |                      |                  N/A |
+-------------------------------+----------------------+----------------------+
At the top right, I can see I’m running CUDA version 12.0, which is backwards compatible with CUDA 11. PyTorch recommends selecting the latest compatible compute package, so in the above selection screen I’ve chosen CUDA 11.8. Once you’ve configured your selection, at the bottom you’re presented with the command to run to install the appropriate version of PyTorch.
Personally, I would recommend installing in a virtual environment, which keeps packages separate and prevents version conflicts. It also allows you to try different versions of packages, which I’ll be making use of later.
Testing PyTorch with GPU
We’d like to test that everything is installed correctly and that we can use our local GPU to train a network. To do this, I’m going to run the Is it a bird? demo from the fast.ai course. The link is to a Kaggle notebook, but obviously I’ll be downloading and running this locally. Note that the duckduckgo_search and fastai Python packages are also required to run this notebook.
We’ll add a code cell near the start to import PyTorch and make sure CUDA is available:

Success! Now, we’ll run through the notebook sequentially starting from Step 1: Download images of birds and non-birds.The GPU comes in when we get to fine-tuning the resnet18 model.

You can double-check that the GPU is working by opening the Windows Task Manager and looking for an increase in GPU load while the above two lines are running. So we’ve succeeded in running PyTorch on Windows with the GPU.
Comparing PyTorch on CPU
To finish up, let’s do a quick comparison and run PyTorch on the CPU instead. It should be possible to disable the GPU in the code, but I didn’t quite manage to figure out how. Instead, I created a new Python virtual environment and installed torch, torchvision and torchaudio without specifying a CUDA version.
Running the notebook again, we can see that CUDA is now not available:

This means PyTorch will default to running on the CPU. Observe the timing difference when fine-tuning resnet18:

On the GPU, it takes about 25 seconds, whereas on the CPU, it takes about 134 seconds. This represents a speedup of over five times using the GPU!
In summary
Hopefully, this post has demonstrated that getting PyTorch running (on Windows) with a local GPU is really a straightforward process once CUDA is installed. Furthermore, we ran a simple demonstration where a neural network trained five times faster on the GPU than on the CPU. So if you’ve got an Nvidia GPU idling by, why not give it a go?